 |
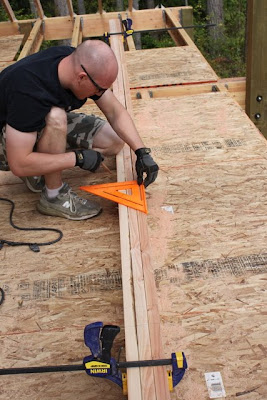
| You'll use three of the same 2"x6"xwhatever you used for all your other roof joists. (We used 2"x 6"x 24' that we special ordered). Measure out your 2"x4" spacing every 3'. |
 |
| Clamp your three boards together so that the ends of the 2"x6"s line up. |
 |
| Transfer your mark from the center board across all three boards. You'll want to trace in the outline for where your 2"x4"s will go |
 |
| Here's a closer look. |
 |
| Set your circular saw to 1 1/2" which is the thickness of a 2"x4" |
 |
| Cut in the lines. To see a video demonstration of Mr. Nick doing this, click here. |
 |
| Here is what it will look like once you've done your "lines" with the circular saw. |
 |
| Knock out your chunks. You can use a chisel to get out any stubborn pieces. |
 |
| This is what it will look like. |
 |
| Lay your 2"x4"s in the spaces. We cut them to 33 1/2". Nail the first row only. |
 |
| Measure on your 2"x4" marks at 16" and 32". You have to do this on every 2"x4". |
 |
| Make your way down the row again, lining up the second notches. |
 |
| Here is an example of how it lines up. |
 |
| Finish up with the last row. |
 |
| Make sure your 2"x4"s are recessed in as your roofing material will lay on top of this. |
 |
| Finished product. Now you have to get it on the roof. More of that in our roofing post to come. |
 |
| Here it is hanging up, now our barn has an eave! |
If you enjoyed this post get free updates by e-mail or RSS.


No comments:
Post a Comment