Monday, August 30, 2010

Hanging your floor joists

I'm a bit behind posting about these floor joists but I have a good excuse ... Mr. Nick needed some video game time. I know, I know, you wouldn't expect a burly man like Mr. Nick to also find enjoyment in the simple act of playing video games but it's true, he loves them. And I personally don't mind it either. I have a theory ... I think when you are as high strung as he is (where his brain is CONSTANTLY thinking, over-analyzing, etc. etc. etc.) it's good to have true down time where he decompresses and lets his thoughts turn to mush. It can only be good for his blood pressure and stress level, right?

But, I've managed to get the computer while he's working out the figures for our roof so now we're back on track!

After you've measured your spacing increments, throw up your joist hangars (side note, on our first course of joists we actually used the little tackers to put them in place until we could get both sides done, then once we were sure they were exactly across from each other we nailed them in, by the time we got to the last bay we felt confident enough to secure them immediately).
Here they are all lined up, like "little soldiers" in Mr. Nick's words.
Once your joist hangars are up on both sides measure the distance in between. It's not uncommon with a post and beam barn for the joist distances to vary slightly with each increment but you can make it up with your joists by either cutting bigger than you need to push it out or smaller than you need and securing it.
Measure your joists. We ended up cutting about 8" off the 12' joist for the center course but then Mr. Nick had the great idea to get 23' joists that we were able to get two joists out of for the right and left side. The hassle of hauling the extra long joists was worth the $80 in savings (hey it all adds up right?)
Here's how Mr. Nick uses the triangle to cut a straight line, every time. See how he lines up his skill saw with the line and then butts up the triangle.
The skillsaw was just a tad shallow so instead of ripping the bits off and potentially causing splinters he ran the good ol' hand saw down the line once for a clean break (this is one of the extra long joists, notice how the only waste is the section in the middle)


Handsome Mr. Nick securing his joist hangars ...
Mostly done, a side note. We both work full time jobs so most of the materials are delivered while we're at work. We didn't have time to count and make sure the lumber yard delivered everything before the weekend and then so we found out at the end of the day on Saturday that they had shorted us 50 joist hangars. Because it wasn't a big box store they weren't open on Sunday and we had to wait until Monday to get the rest of our materials, a little frustrating but a pretty painless way to learn a very important lesson, always make sure you are delivered exactly what you paid for!

Saturday, August 28, 2010

Wind girts and skirting, oh my!

Here we are hanging in all our wind girt glory ... Nice!
The wind girts create nailing surfaces for the siding. We used 2" x 6", Douglas Fir, #2 studs. A few words on studs. There are two different kinds, Douglas Fir and Hemlock Fir. Lowes and Home Depot sell Hemlock Fir and most local "non-big" box stores (we have Bayview Lumber and ProBuild (formerly Lumbermans)) sell Douglas Fir. So what's the difference? Doug Fir is stronger than Hem Fir. #2 basically means, "second best" which translates into some sort of visual defect but not structural, and are cheaper. If your boards don't need to be absolutely straight than it's worth considering.

So, step by step, here's how we prepped for the hanging of the wind girts.

#1 Consult your plans, your engineer will have laid out your plans to show you at what increments your girts should be placed. He'll also tell you what size boards you will need.
#2 Get into place. Consult your plans again (measure twice cut once, right?)
#3 Measure your spacing marks. We measured from the top of the posts because we had already leveled off the top of the posts and we knew they were all the same. This is one instance though where you could measure from your common laser level mark.
#4 Once you have your lines marked on your corner posts you can use a chalk line to snap in the marks for the middle beams.
#5 Have one person hold the one side and the other hold the other (this is rocket science I know). It's worth nothing that in the end we didn't like how the snap line turned out and ended up measuring each posts marks one by one (like Mr. Nick is doing in step #3)
As part of the wind girt process we also put up the mud skirts. We re-used the concrete forms from our concrete pad installation but didn't re-use the original line. As you can see we went 1" below the original line to overlap the concrete and make sure there is no gap for critters and draft breezes to get through.

The girts went up very easy, I hold one end, Nick holds the other, nail-gun "bang, bang, bang". Repeat. Here's a short visual.


Wednesday, August 25, 2010

5 "no brainer" ways to save money on your home improvement project

Put the money back in your pocket!
(The chalk line broke last night so Mr. Nick had to fix it, I liked the way it made his hands look though).
1. Return the items you don't use.
Whether you're undertaking a large scale construction project or a small scale renovation you will almost inevitably end up with more supplies than you need. I think the biggest place this is likely to happen is plumbing. Honestly I think being sent to to the store by yourself with nothing but a list from your plumber (professional or not) only to return with the wrong part is cruel and unusual punishment. This happened to me several times with a professional plumber (Mr. Nick was overseas for a year in Kyrgyzstan so I had to suck it up and pay) until finally I ended up buying two of everything in the aisle. Overkill I know, but truly I was at my wits end. And what do you know, I had the right parts! The morale of this story though, is to return the parts you don't end up using. Even little $2 and $3 pieces add up quickly. Mr. Nick and I keep a bucket full of odds and ends and try to go about once a month to get caught up.

2. Take advantage of warranties.
When I buy a tool I expect it work and Mr. Nick is even harder on tools than I am. If something breaks while I was properly using it I take it back. Lowes sells a brand "Kobalt" and it actually says on the package, guaranteed for life. We took back a measuring tape which was pretty beat up but they changed it out no problem.

3. Bid out your materials package.
If you're doing a large scale project most likely you will have a materials list. However, even with simple products (we're currently in the market for garage doors) it pays to shop around. We ended up buying our lumber package at a local lumber store, not a big box chain. A lumber store we almost didn't ask for a bid from since everyone in town said they were expensive. However, they ended up being the cheapest ... by a lot! So for us, it has paid to shop around.

4. Always return rental equipment with a full gas tank.
This one we have gotten lazy on a couple times and each time I do it I kick myself in the foot. It's so easy! For example, when we rented the plate compactor I filled it up with .89 of gas. Cheap! Had I turned it in empty though it would have been $3.99 for the fuel surcharge. It doesn't seem like much but it adds up.

5. Make smart decisions on whether you should buy or rent tools.This is a lesson we learned from my parents who spent a fortune renting scaffolding to build their house before finally breaking down and purchasing a set. Side note: this purchase has worked out quite well for us now that they are done with it and we get to use it for free, or at least I haven't gotten a bill yet from my mother :) Renting tools is pretty economical when you think about what you're getting. However, renting may not be the right choice for you. We opted to buy our chainsaw and our tractor when we considered what the daily charge was for the equipment and how many times we would most likely use it.

Tuesday, August 24, 2010

Raising the beams, higher and higher

This weekend we finished what Mr. Nick started and raised the eight middle beams (yes he's amazing but even he needed a second set of hands to get those big ones up). I think even our poor tractor was happy when it was done being asked to haul those big beams, but let the record show good ol' Kubota made it happen! It was pretty uneventful with only one "Oh S*$!, that beam is falling," but we managed to secure it and no one was hurt (but notice we have on our hard hats!)


There were three sizes of beams:
The smallest went along the two sides, Mr. Nick cut this little shelf out and then bolted them into place (these are the ones he raised by himself on Friday)
The medium ones are the two top ones (the highest). One side was pre-made with the "L" and once the beam was in place Mr. Nick made secured it in with the other two 2" x 6"s. The little 2" x 6" running horizontal is to keep the two beams together (it's over 24' up, they want to naturally splay out a little).
And the biggest are the ones that run as the ceiling of the first floor. They were 19.5" wide! Here's a start of what Mr. Nick did for them to rest on. He used the leftover tops that we chopped off of the beams to make them all the same size (in order to determine where to cut off we measured from our "common point" that we made with the laser level).
Mr. Nick securing the beams in.
Finished product!

Song Credit: Passion Pit, "Little Secrets". If you haven't heard of them, check them out. They're pretty amazing.

Friday, August 20, 2010

When husbands moonlight as superheroes

My husband never ceases to amaze me. I'm still not quite sure how he did it, but I think I figured out how the Egyptian's built the pyramids ... they must have had about 50 Mr. Nick's on their service.


So this weekend it's our job to get the rest of them up!

If the video isn't loading for you, click here.

Sunday, August 15, 2010

Concrete slab in seven hours or less

We poured our concrete slab this weekend and it was a huge success. If you want to watch the video click here.


Here's some key things that we did in order to prep the space for a seamless pour:

On the Tuesday night before the Saturday pour we marked where we wanted the four loads of gravel to go. This was important for us since we both have full time jobs we knew we probably weren't going to be able to leave to be there for the crushed gravel drop-off.
And it worked! Here's the four piles, just like we wanted.
After we installed the concrete forms we reinforced each board with two 3' steel stakes to make sure they didn't "blow out".
We wrapped each post in tar paper to keep the concrete from sticking to the post. If the concrete were to stick to the post, when it settled, it would most likely crack.
We used duplex nails to help with the prying off of our form boards.
We plan for this barn to be a 2 horse barn so we didn't lay concrete in the stall portion (it's really bad for their legs). We used 2" x 6" for these and reinforced with steel stakes again.

We dug out the area along the edge in order to reinforce (less gravel and more concrete equals stronger edge). This was especially important to do on the lips we plan on driving over to get into the barn.

Here's what I carved into the pad. I didn't want to write something like Rachael loves Nick because this house is an investment and should we sell it I highly doubt someone is going to want that on their garage floor. But, I had to personalize it a little. This is a totally side note but when Mr. Nick designed my engagement rink (really designed it, drew it on a piece of paper had a mold cast and everything) he drew an infinity in the side that is filled with purple sapphires. I think it's especially cool because his engineering homework from the Academy has little infinity signs on it ... practice does make perfect!
The other thing we did, which we haven't done before, was pay for help. Mr. Nick put a craigslist add up for a skilled concrete pourer and Joe answered. He was only $200 for the whole day and provided invaluable expertise, not to mention his tools. We did rent the compactor, one come-along (the thing that looks like a rake), and the power trowel, but he provided everything else. It took 26 yards of concrete to fill our 36' x 48' space (minus the two horse stalls). We scheduled the three trucks for 30 minutes apart which provided the perfect amount of overlap (again, had we not had Joe this probably would have been to close together). We started early (first truck arrived at 7:30 but we were there at 6:30) which was also smart since the Pacific Northwest is in a bit of a heat wave right now hitting the upper 90s, reinforcing the adage, concrete waits for no one ... it will dry whether you're ready for it or not.  Thankfully, we were ready!

Song Credit: Discovery "So Insane". We love them. If you want to hear their other song we've done a video to check out our Conduit Loop Line video from laying our power cable.

Thursday, August 12, 2010

Towing and hauling on the right side of the law

When building a house, regardless of whether you are doing it yourself or not, chances are you will be involved in hauling materials. We're not even six months in and I've already had two altercations involving improper hauling.

The first time I was leaving the dirt yard and didn't realize they had dumped sand all over my tailgate. The officer (of the law) pulled me over, gave me a hard time, and let me go with a warning, this time, since I didn't know I was in violation. (Side note, that I have already mentioned. The yard has a big sign that says under no condition can you get out of the car, which I took seriously. Now I know that sometime between the yard and the road I need to stop and clean off my tailgate so I don't get in trouble again. I even carry a broom in my truck box so it's simple and easy no matter what). The second time I was hauling the cute adirondak chairs that my mom bought us and we just set them in the back like idiots. Well of course, one flew out and went flying across the road. Thankfully, no one was hurt and I was able to recover it (after a pretty harrowing re-enactment of Frogger). But had we not been so lucky I would have been liable for not securing my load.

So, now that I know better I am taking the time to be informed! Here's the information I was able to gather together pretty easily: 
In addition, here's a great article on "How car towing regulations work".

And finally, when do you need a flag on your load, and how far can it extend? Well this information was actually harder to find but I finally found some answers on the Washington State Patrol website (originally I was looking for answers on the Department of Transportation site). I did a quick cursory look for other states and found that they too house their info on the applicable State Patrol site. For us here in the Evergreen State our vehicle cannot exceed 14 ft in height, 8 ft. 6 in. in width and 40 ft. in length PLUS 3 ft. of front overhang and 4 ft. of rear overhang ... as long as there's a cute little "flag". Happy Hauling my friends!

Wednesday, August 11, 2010

Setting your concrete forms

We decided to move forward with putting the concrete pad in because we knew we would have to do it at some point and by doing it now it gives us a stable base for doing all our vertical construction (rather than having to work on top of dirt, which becomes an especially big factor in the Pacific Northwest when we get into the rainy season).

*Boring Alert*
You will probably only enjoy these videos if you happen to be in the market for learning about a laser level, want to know how to put concrete forms up or just really enjoy looking at Mr. Nick.

Monday, August 9, 2010

Plumbing up our poles and learning that sometimes the hug is inferred

What a weekend! Mr. Nick and I worked our little butts off and got all the poles for the barn plumb (straight up and down). Sadly I didn't take any video, which seemed reasonable at the time because it was raining and the work was pretty tedious. However, looking back now I would have loved to re-watch the 2" x 4" cracking on my head, resulting in super hideous crying face. Mr. Nick, who was bear hugging two giant 26' poles at the time, could only respond, "Oh babe, I'm so sorry, I would hug you right now but I can't let these go," to which I replied (making hideous crying face even more contorted) "I know (sniff, sniff), I know."

Of course there wasn't much time for tears as I had to get another 2" x 4" in order to continue trying to jimmy the two giants into place before we could cement them. We got there eventually (one more bonk in the head with the 2"x 4" and a pretty nasty spill when I lost my footing, Mr. Nick still clinging to the poles). Maybe it's better we weren't video taping though as I consider just how dangerous we were being. Of course, my husband, ever the protector told me (while I was bear hugging just one giant pole), "If it falls, get out of the way." To which I asked, "Even if it's going towards the tractor?" and he answered, "Even if it's going towards the tractor." Melt my heart, who said chivalry was dead?

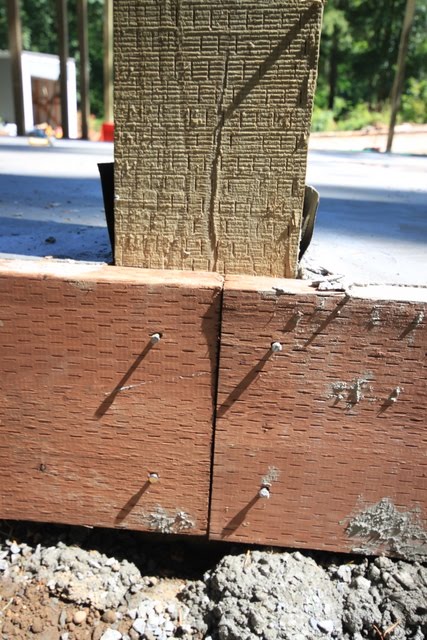
Here's the poles at the end of Day 2, with the braces holding them up.
In order to save money on supplies we re-used, doing half the first day and half the second day.
Each pole was secured on two sides before we could cement them in.

Wednesday, August 4, 2010

How to save money on your site prep

Well it's official. We got our building permit today which means we are now free and clear to build. Here are the steps that had to happen before we could get it:

  • Submit barn plans to the County and wait for them to be reviewed
  • Have water tested and approved (through County)
  • Have septic design with approval
  • Have acceptable erosion control measures in place (another inspection from the County)
  • Paid building permit fee (which covers costs for the County to inspect and the costs for them to review plans. It's based on the size of the building and the use. This first building permit is not as expensive because the barn is considered an agricultural building).
We also got the go ahead from the County to cover up our post holes (they came out and inspected the foundation).

Now, you may be wondering, how did we dig the holes and put those posts in without having the building permit ... I think we're also wondering that too (or at least I am). I asked Mr. Nick and he said, "Well technically we needed to have the building permit before starting" (voice fades off into non-discernible conversation with himself). So, no harm no foul I suppose.

Now, that we can "officially" build, here's how we saved money on our site prep.

  • We are having the same guy who is installing our septic system (in Thurston County, as of 2010, you have to have a licensed septic installer install your septic. This was a bit of shock to us as we were planning on installing it ourselves (Mr. Nick had designed it). Once we learned we couldn't do that we decided to get the same guy who was going to install our septic to also do the prep work for the barn site. This means one bid for two projects and ultimately a better deal (just like buying in bulk at Costco).
  • For our barn site we needed to bring in quite a bit of fill dirt to make a level "pad". One way we were able to save money was through our septic/earthwork guy who knew about a church that was doing some construction and was looking to get rid of their dirt (read, FREE DIRT!) In most areas there are always places looking to get rid of dirt, you just have to put your feelers out.
  • We asked our septic installer if we could get his supplier price for the septic parts (he gets a discount because he buys in bulk) and he agreed. Which means we bought directly from the supplier with his price.
So that's it. The bottom line is, if you don't ask (for a discount or a special deal) then you'll never know (no one is going to offer it to you out of the goodness of their heart). I'm not so good at this (I'm also a terrible barterer ... I could be the only person who was told "no" by vendors in Tijuana, Mexico). But Mr. Nick, is super good at this which is just one more reason why I'm so happy to be going through this journey with him.

Sumner, Washington: Where even the Salvation Army has antiques

While my mom was here a few weekends ago I took a day off work to prowl around some places we hadn't been before. Of course we went up into Tacoma to check out their REstore but didn't really find anything (and I must say, my Olympia REstore is way better priced).

We did find a quilt shop (recommended by my mother-in-law who always finds a new shop when she visits). The Quilt Barn in Puyallup has an excellent selection of batiks and patterns (I was able to get some more fabric for our m. bedroom quilt but still haven't settled on a pattern).

Of course I would say the highlight was visiting Sumner, Washington and the highlight of highlights being Today's Country Store. As soon as you walk into the store you feel a sense of home, happiness and slightly extravagant decorating wash over you. Their displays are artfully arranged and so well thought out I found myself staring, mouth slightly agape, wanting to box up the whole store and take it home. Unfortunately I didn't walk away with anything (I am trying really hard to only buy things right now that benefit the building process) but my mother found three amazing finds for less than $100!

This antique paper cutter now sits on the edge of her island
(which really is a salvaged bowling alley, complete with the lane dots and everything).
Vintage oar (they're going to become hand rails for her walkway down to the front half of the house).
And yes, that's one of her outside cat's Dog Cat (DC) for short.
The vintage electricians tool chest now houses all her paints
(she is a beyond talented toll painter.  I'll have to share some of her work).
One more shot, she made all the miniature quilts on the wall behind her.
So the one thing I really am in the market for is a buffet that we can turn into the sink for the bathroom. The Salvation Army down the street had quite a few nice selections all for under $100 so I think we will definitely be going back. And of course, when it's time to feather my nest I will be returning to Today's Country Store. If you go, don't forget to go in the back where they have vintage-y garden things just as nicely displayed. I now officially want a vintage wagon (Radio Flyer) and vintage-y bicycle with great big basket on it. If this gardening thing doesn't start panning out I'm going to settle on decorating my life with rusty metal.

Tuesday, August 3, 2010

How clean is your water?

This weekend Home Depot offered a "free water testing" to anyone who brought in 5 oz. of their water. Of course, the testing was sponsored by Kinetico Water Systems so you had to be prepared to hear the very minimal sales pitch about their water filtering system.

We found out that our water has a PH of 7.3 which is on the alkaline side of fabulous (according to the man this will be great for my skin). We have 0 iron and 0 chlorine (awesome!) and our hardness is at 4. This is the only thing that concerns me as every house we have lived in in the Pacific Northwest has PLAGUED me with the calcium spots on the shower doors, curtains, everything. But that's okay, we have time to fix that.

What I most wanted to share was the Consumer Reports printout they provided rating different water filter system. Some of these things I have never heard of, who knew there were so many options? I will definitely be researching further before purchasing!

Monday, August 2, 2010

How to set the posts for your barn

Visible progress!

This weekend we dug the post holes, filled them with 10" of concrete and set the posts in them. We need to have them inspected before we square them up and back fill so right now it's kind of ramshackle but it's beginning to look like *something*.


If you can't view the video, click here.

In case you're curious this video is set to Edward Sharpe and the Magnetic Zeros "40 Day Dream". Mr. Nick and I bought tickets to see them at Bumpershoot 2010 so we're pretty excited, finally the retun of the Rock Opera!
Related Posts with Thumbnails