Showing posts with label New Construction. Show all posts

Sunday, September 12, 2010

Put a roof over your head

Over the past two weekends we've been working pretty hard to get a good stable roof over our heads and this weekend we finished it! Side Note: We only did as far as the roof joists and sheathing. We're 99% sure we're going to have a professional do the tar paper and shingles for a few reasons:
  • We're on a pretty short deadline to get watertight and we don't really have the time to give to the roof.
  • Mr. Nick won't let me on the steep incline for long periods of time to help him because he says I'm dangerous. I told him, "Ha! I laugh in the face of danger" and he replied, "No, you laugh as danger's hitting you in the face."
  • We're not professionals and, let's face it, this is our roof.
  • Did I mention how steep it is?
The roof in general was a big task, one that I was mildly de-motivated by on the first day (we used 2"x6"x24' for our roof joists, just getting them from the ground to the top was a big task, not to mention cutting two bird's mouths and two angles out of each of them). But, then Mr. Nick told me to just think of it as 16" at a time (the distance between roof joists) and that helped a lot. Either way. Here's the big steps.

Hurricane ties on both the tops of the walls and the tops of the beams.
We made these little "bird houses" in order to make sure our roof joists all lined up properly. There is a bird house on each side sandwiching the 2"x4"x24's. 16" at time ... 
Finished! That's our cute little shed dormer poking out the side (the only part I was allowed to nail the sheathing on top of). The rest Mr. Nick did, isn't he amazing!?


Wednesday, September 8, 2010

How to construct your building eaves

Almost any building has eaves to keep the water off the exterior walls. Here's our simple step by step process for how we built the two gable eaves (one gable eave = two of the lookout sections below) that are going on our barn (roofing video to come soon I promise).

You'll use three of the same 2"x6"xwhatever you used for all your other roof joists. (We used 2"x 6"x 24' that we special ordered). Measure out your 2"x4" spacing every 3'.
Clamp your three boards together so that the ends of the 2"x6"s line up.
Transfer your mark from the center board across all three boards. You'll want to trace in the outline for where your 2"x4"s will go
Here's a closer look.
Set your circular saw to 1 1/2" which is the thickness of a 2"x4"
Cut in the lines. To see a video demonstration of Mr. Nick doing this, click here.
Here is what it will look like once you've done your "lines" with the circular saw.
Knock out your chunks. You can use a chisel to get out any stubborn pieces.
This is what it will look like.
Lay your 2"x4"s in the spaces. We cut them to 33 1/2". Nail the first row only.
Measure on your 2"x4" marks at 16" and 32". You have to do this on every 2"x4".
Make your way down the row again, lining up the second notches.
Here is an example of how it lines up.
Finish up with the last row.
Make sure your 2"x4"s are recessed in as your roofing material will lay on top of this.
Finished product. Now you have to get it on the roof. More of that in our roofing post to come.
Here it is hanging up, now our barn has an eave!

Monday, August 30, 2010

Hanging your floor joists

I'm a bit behind posting about these floor joists but I have a good excuse ... Mr. Nick needed some video game time. I know, I know, you wouldn't expect a burly man like Mr. Nick to also find enjoyment in the simple act of playing video games but it's true, he loves them. And I personally don't mind it either. I have a theory ... I think when you are as high strung as he is (where his brain is CONSTANTLY thinking, over-analyzing, etc. etc. etc.) it's good to have true down time where he decompresses and lets his thoughts turn to mush. It can only be good for his blood pressure and stress level, right?

But, I've managed to get the computer while he's working out the figures for our roof so now we're back on track!

After you've measured your spacing increments, throw up your joist hangars (side note, on our first course of joists we actually used the little tackers to put them in place until we could get both sides done, then once we were sure they were exactly across from each other we nailed them in, by the time we got to the last bay we felt confident enough to secure them immediately).
Here they are all lined up, like "little soldiers" in Mr. Nick's words.
Once your joist hangars are up on both sides measure the distance in between. It's not uncommon with a post and beam barn for the joist distances to vary slightly with each increment but you can make it up with your joists by either cutting bigger than you need to push it out or smaller than you need and securing it.
Measure your joists. We ended up cutting about 8" off the 12' joist for the center course but then Mr. Nick had the great idea to get 23' joists that we were able to get two joists out of for the right and left side. The hassle of hauling the extra long joists was worth the $80 in savings (hey it all adds up right?)
Here's how Mr. Nick uses the triangle to cut a straight line, every time. See how he lines up his skill saw with the line and then butts up the triangle.
The skillsaw was just a tad shallow so instead of ripping the bits off and potentially causing splinters he ran the good ol' hand saw down the line once for a clean break (this is one of the extra long joists, notice how the only waste is the section in the middle)


Handsome Mr. Nick securing his joist hangars ...
Mostly done, a side note. We both work full time jobs so most of the materials are delivered while we're at work. We didn't have time to count and make sure the lumber yard delivered everything before the weekend and then so we found out at the end of the day on Saturday that they had shorted us 50 joist hangars. Because it wasn't a big box store they weren't open on Sunday and we had to wait until Monday to get the rest of our materials, a little frustrating but a pretty painless way to learn a very important lesson, always make sure you are delivered exactly what you paid for!

Saturday, August 28, 2010

Wind girts and skirting, oh my!

Here we are hanging in all our wind girt glory ... Nice!
The wind girts create nailing surfaces for the siding. We used 2" x 6", Douglas Fir, #2 studs. A few words on studs. There are two different kinds, Douglas Fir and Hemlock Fir. Lowes and Home Depot sell Hemlock Fir and most local "non-big" box stores (we have Bayview Lumber and ProBuild (formerly Lumbermans)) sell Douglas Fir. So what's the difference? Doug Fir is stronger than Hem Fir. #2 basically means, "second best" which translates into some sort of visual defect but not structural, and are cheaper. If your boards don't need to be absolutely straight than it's worth considering.

So, step by step, here's how we prepped for the hanging of the wind girts.

#1 Consult your plans, your engineer will have laid out your plans to show you at what increments your girts should be placed. He'll also tell you what size boards you will need.
#2 Get into place. Consult your plans again (measure twice cut once, right?)
#3 Measure your spacing marks. We measured from the top of the posts because we had already leveled off the top of the posts and we knew they were all the same. This is one instance though where you could measure from your common laser level mark.
#4 Once you have your lines marked on your corner posts you can use a chalk line to snap in the marks for the middle beams.
#5 Have one person hold the one side and the other hold the other (this is rocket science I know). It's worth nothing that in the end we didn't like how the snap line turned out and ended up measuring each posts marks one by one (like Mr. Nick is doing in step #3)
As part of the wind girt process we also put up the mud skirts. We re-used the concrete forms from our concrete pad installation but didn't re-use the original line. As you can see we went 1" below the original line to overlap the concrete and make sure there is no gap for critters and draft breezes to get through.

The girts went up very easy, I hold one end, Nick holds the other, nail-gun "bang, bang, bang". Repeat. Here's a short visual.


Tuesday, August 24, 2010

Raising the beams, higher and higher

This weekend we finished what Mr. Nick started and raised the eight middle beams (yes he's amazing but even he needed a second set of hands to get those big ones up). I think even our poor tractor was happy when it was done being asked to haul those big beams, but let the record show good ol' Kubota made it happen! It was pretty uneventful with only one "Oh S*$!, that beam is falling," but we managed to secure it and no one was hurt (but notice we have on our hard hats!)


There were three sizes of beams:
The smallest went along the two sides, Mr. Nick cut this little shelf out and then bolted them into place (these are the ones he raised by himself on Friday)
The medium ones are the two top ones (the highest). One side was pre-made with the "L" and once the beam was in place Mr. Nick made secured it in with the other two 2" x 6"s. The little 2" x 6" running horizontal is to keep the two beams together (it's over 24' up, they want to naturally splay out a little).
And the biggest are the ones that run as the ceiling of the first floor. They were 19.5" wide! Here's a start of what Mr. Nick did for them to rest on. He used the leftover tops that we chopped off of the beams to make them all the same size (in order to determine where to cut off we measured from our "common point" that we made with the laser level).
Mr. Nick securing the beams in.
Finished product!

Song Credit: Passion Pit, "Little Secrets". If you haven't heard of them, check them out. They're pretty amazing.

Sunday, August 15, 2010

Concrete slab in seven hours or less

We poured our concrete slab this weekend and it was a huge success. If you want to watch the video click here.


Here's some key things that we did in order to prep the space for a seamless pour:

On the Tuesday night before the Saturday pour we marked where we wanted the four loads of gravel to go. This was important for us since we both have full time jobs we knew we probably weren't going to be able to leave to be there for the crushed gravel drop-off.
And it worked! Here's the four piles, just like we wanted.
After we installed the concrete forms we reinforced each board with two 3' steel stakes to make sure they didn't "blow out".
We wrapped each post in tar paper to keep the concrete from sticking to the post. If the concrete were to stick to the post, when it settled, it would most likely crack.
We used duplex nails to help with the prying off of our form boards.
We plan for this barn to be a 2 horse barn so we didn't lay concrete in the stall portion (it's really bad for their legs). We used 2" x 6" for these and reinforced with steel stakes again.

We dug out the area along the edge in order to reinforce (less gravel and more concrete equals stronger edge). This was especially important to do on the lips we plan on driving over to get into the barn.

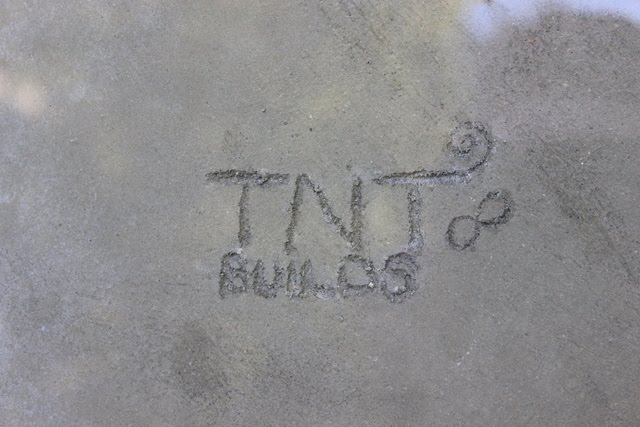
Here's what I carved into the pad. I didn't want to write something like Rachael loves Nick because this house is an investment and should we sell it I highly doubt someone is going to want that on their garage floor. But, I had to personalize it a little. This is a totally side note but when Mr. Nick designed my engagement rink (really designed it, drew it on a piece of paper had a mold cast and everything) he drew an infinity in the side that is filled with purple sapphires. I think it's especially cool because his engineering homework from the Academy has little infinity signs on it ... practice does make perfect!
The other thing we did, which we haven't done before, was pay for help. Mr. Nick put a craigslist add up for a skilled concrete pourer and Joe answered. He was only $200 for the whole day and provided invaluable expertise, not to mention his tools. We did rent the compactor, one come-along (the thing that looks like a rake), and the power trowel, but he provided everything else. It took 26 yards of concrete to fill our 36' x 48' space (minus the two horse stalls). We scheduled the three trucks for 30 minutes apart which provided the perfect amount of overlap (again, had we not had Joe this probably would have been to close together). We started early (first truck arrived at 7:30 but we were there at 6:30) which was also smart since the Pacific Northwest is in a bit of a heat wave right now hitting the upper 90s, reinforcing the adage, concrete waits for no one ... it will dry whether you're ready for it or not.  Thankfully, we were ready!

Song Credit: Discovery "So Insane". We love them. If you want to hear their other song we've done a video to check out our Conduit Loop Line video from laying our power cable.

Thursday, August 12, 2010

Towing and hauling on the right side of the law

When building a house, regardless of whether you are doing it yourself or not, chances are you will be involved in hauling materials. We're not even six months in and I've already had two altercations involving improper hauling.

The first time I was leaving the dirt yard and didn't realize they had dumped sand all over my tailgate. The officer (of the law) pulled me over, gave me a hard time, and let me go with a warning, this time, since I didn't know I was in violation. (Side note, that I have already mentioned. The yard has a big sign that says under no condition can you get out of the car, which I took seriously. Now I know that sometime between the yard and the road I need to stop and clean off my tailgate so I don't get in trouble again. I even carry a broom in my truck box so it's simple and easy no matter what). The second time I was hauling the cute adirondak chairs that my mom bought us and we just set them in the back like idiots. Well of course, one flew out and went flying across the road. Thankfully, no one was hurt and I was able to recover it (after a pretty harrowing re-enactment of Frogger). But had we not been so lucky I would have been liable for not securing my load.

So, now that I know better I am taking the time to be informed! Here's the information I was able to gather together pretty easily: 
In addition, here's a great article on "How car towing regulations work".

And finally, when do you need a flag on your load, and how far can it extend? Well this information was actually harder to find but I finally found some answers on the Washington State Patrol website (originally I was looking for answers on the Department of Transportation site). I did a quick cursory look for other states and found that they too house their info on the applicable State Patrol site. For us here in the Evergreen State our vehicle cannot exceed 14 ft in height, 8 ft. 6 in. in width and 40 ft. in length PLUS 3 ft. of front overhang and 4 ft. of rear overhang ... as long as there's a cute little "flag". Happy Hauling my friends!

Wednesday, August 11, 2010

Setting your concrete forms

We decided to move forward with putting the concrete pad in because we knew we would have to do it at some point and by doing it now it gives us a stable base for doing all our vertical construction (rather than having to work on top of dirt, which becomes an especially big factor in the Pacific Northwest when we get into the rainy season).

*Boring Alert*
You will probably only enjoy these videos if you happen to be in the market for learning about a laser level, want to know how to put concrete forms up or just really enjoy looking at Mr. Nick.

Monday, August 9, 2010

Plumbing up our poles and learning that sometimes the hug is inferred

What a weekend! Mr. Nick and I worked our little butts off and got all the poles for the barn plumb (straight up and down). Sadly I didn't take any video, which seemed reasonable at the time because it was raining and the work was pretty tedious. However, looking back now I would have loved to re-watch the 2" x 4" cracking on my head, resulting in super hideous crying face. Mr. Nick, who was bear hugging two giant 26' poles at the time, could only respond, "Oh babe, I'm so sorry, I would hug you right now but I can't let these go," to which I replied (making hideous crying face even more contorted) "I know (sniff, sniff), I know."

Of course there wasn't much time for tears as I had to get another 2" x 4" in order to continue trying to jimmy the two giants into place before we could cement them. We got there eventually (one more bonk in the head with the 2"x 4" and a pretty nasty spill when I lost my footing, Mr. Nick still clinging to the poles). Maybe it's better we weren't video taping though as I consider just how dangerous we were being. Of course, my husband, ever the protector told me (while I was bear hugging just one giant pole), "If it falls, get out of the way." To which I asked, "Even if it's going towards the tractor?" and he answered, "Even if it's going towards the tractor." Melt my heart, who said chivalry was dead?

Here's the poles at the end of Day 2, with the braces holding them up.
In order to save money on supplies we re-used, doing half the first day and half the second day.
Each pole was secured on two sides before we could cement them in.

Related Posts with Thumbnails